This is how you can create screen casting using GNOME’s inbuilt screen recording feature.
There are plenty of screen-casting or screen recording software available in Linux ecosystem which can be used (e.g. SimpleScreenRecorder) but all these software need adding an extra PPA and corresponding files.
Ubuntu’s GNOME Shell comes with an inbuilt screen recording feature which many users are not aware of and in this tutorial I will explain how to use the GNOME’s inbuilt screen recording feature which is very simple to use.
How to record desktop using GNOME Shell
Note that this feature will record everything on your screen. To start the recording anytime, type below key combinations from keyboard:
CTRL + ALT + SHIFT + R
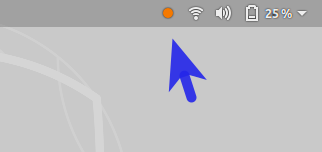
Once the screen recording starts and you can see a small red circle icon at the right top section of the desktop. This means recording is in progress.
To stop the recording, press the same key combination again and the recording will be stopped. The recorded video file will be saved in your videos folder. You do not have a Videos folder it’ll be saved in your home directory.
The default recording format of the video file is webm and it comes with automatic naming convention.

This is how you can use the inbuilt GNOME’s screen-casting or screen recording feature without installing any native Linux softwares.
If you found this article useful proper comment below also let us know what is your favorite screen-casting software in Linux.


